Amazon Location Service+Vue.jsマップアプリケーション

Amazon Location Serviceとは、AWS内で利用できる位置情報アプリケーションを構築するためのサービスです。主な機能は、地図表示機能・住所検索機能・ルート検索機能・ジオフェンス機能・トラッキング機能の5種類があります。こんかいは地図表示機能を利用しマップアプリケーションを構築してみます。
Amazon Location Service+Vue.jsマップアプリケーション
事前に、以下の記事をお読みください。
この記事は、 2021年06月に公開された記事を元にしています。
参考: Amazon Location Service開発者ガイド マップ
- ① 概要説明編
- ② Amplify利用準備・初期設定編
- ③ Authでユーザー登録、ログイン機能実装編
- ④ API(Graphql)でCRUD実装編
- ⑤ StorageでS3に画像保存実装編
- ⑥ Hostingでアプリ公開&自動デプロイ実装編
Amazon Location Mapsの設定
はじめに、AWSコンソールでAmazon Location Mapsの設定をします。
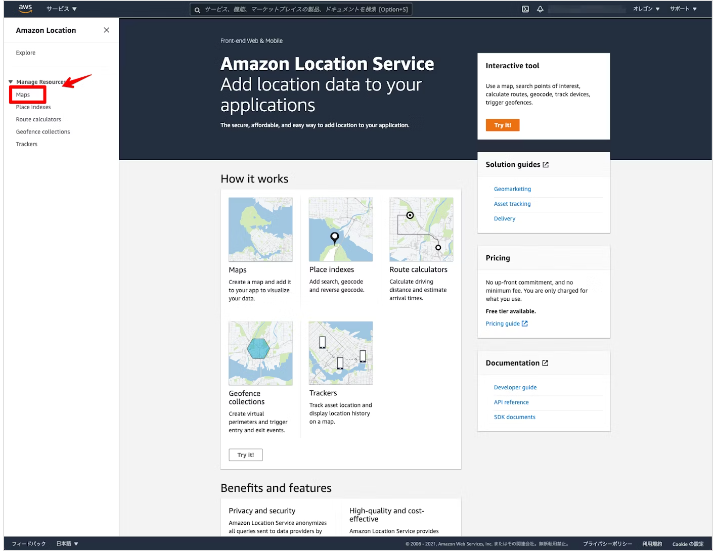
「Maps」をクリックします。
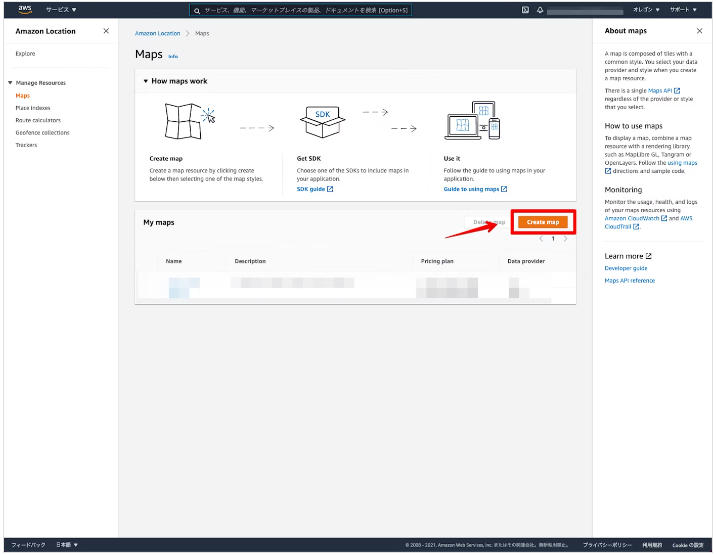
「Create map」をクリックします。
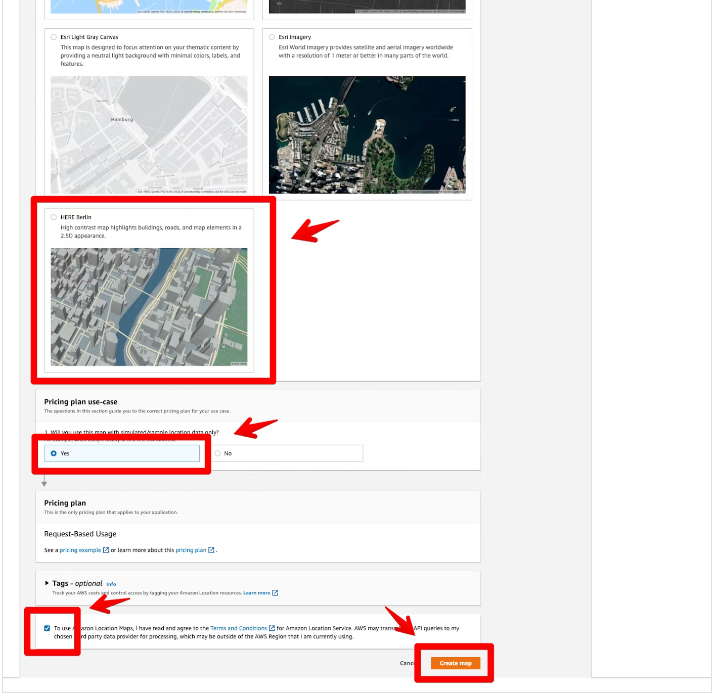
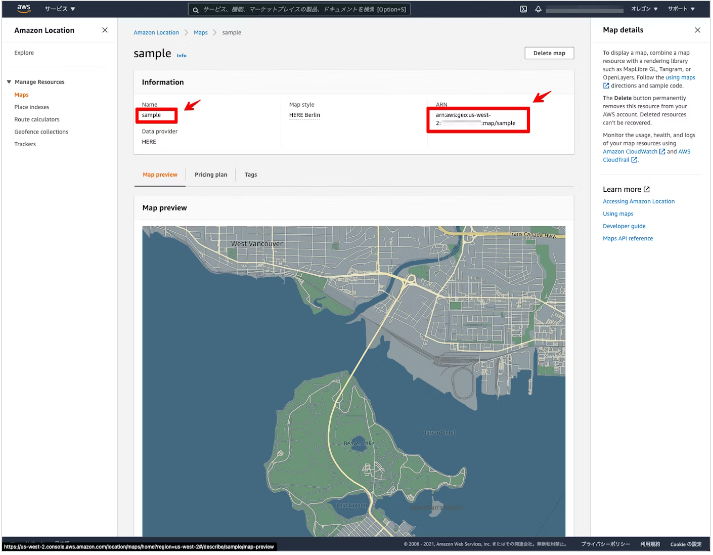
マップ名の入力とマップを選択します。今回は「sample」としました。

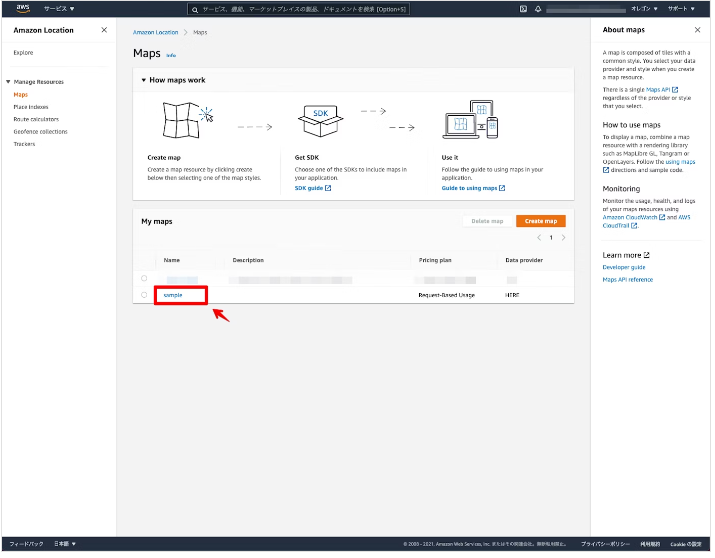
作成されたマップをクリックします。
ここで表示されている「Name」と「ARN」を今後の設定で利用するのでコピーしておきます。
これでAmazon Location Mapsの設定は完了になります。
フロントエンド
次に、実際にマップアプリケーションを構築していきます。
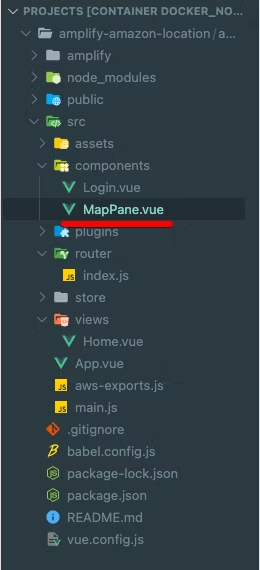
AmplifyとVue.jsの構成ができていると、基本的には「MapPane.vue」を新規で追加するのと、コードを一部変更するのみになります。
実行環境(2021年06月時点)
- node v16.3.0
- npm v7.15.1
事前に、MapLibre GL JSのパッケージをインストールします。
npm install maplibre-gl全体構成
package.json
{
  "name": "amazon-location-app",
  "version": "0.1.0",
  "private": true,
  "scripts": {
    "serve": "vue-cli-service serve",
    "build": "vue-cli-service build",
    "lint": "vue-cli-service lint"
  },
  "dependencies": {
    "@aws-amplify/ui-vue": "^1.0.12",
    "aws-amplify": "^4.1.1",
    "core-js": "^3.6.5",
    "maplibre-gl": "^1.14.1-rc.2",
    "vue": "^2.6.11",
    "vue-router": "^3.2.0",
    "vuetify": "^2.4.0",
    "vuex": "^3.4.0"
  },
  "devDependencies": {
    "@vue/cli-plugin-babel": "~4.5.0",
    "@vue/cli-plugin-eslint": "~4.5.0",
    "@vue/cli-plugin-router": "~4.5.0",
    "@vue/cli-plugin-vuex": "~4.5.0",
    "@vue/cli-service": "~4.5.0",
    "babel-eslint": "^10.1.0",
    "eslint": "^6.7.2",
    "eslint-plugin-vue": "^6.2.2",
    "sass": "~1.32.0",
    "sass-loader": "^10.0.0",
    "vue-cli-plugin-vuetify": "~2.4.1",
    "vue-template-compiler": "^2.6.11",
    "vuetify-loader": "^1.7.0"
  },
  "eslintConfig": {
    "root": true,
    "env": {
      "node": true
    },
    "extends": [
      "plugin:vue/essential",
      "eslint:recommended"
    ],
    "parserOptions": {
      "parser": "babel-eslint"
    },
    "rules": {}
  },
  "browserslist": [
    "> 1%",
    "last 2 versions",
    "not dead"
  ]
}
/src
main.js
import Vue from 'vue'
import App from './App.vue'
import router from './router'
import store from './store'
import vuetify from './plugins/vuetify'

// MapLibre GL JSのCSSを読み込み
import 'maplibre-gl/dist/maplibre-gl.css'

// Amplify読み込み
import '@aws-amplify/ui-vue'
import Amplify from 'aws-amplify'
import awsconfig from './aws-exports'
Amplify.configure(awsconfig)

Vue.config.productionTip = false

new Vue({
  router,
  store,
  vuetify,
  render: h => h(App)
}).$mount('#app')
MapLibre GL JSを読み込みます。
// MapLibre GL JSのCSSを読み込み
import 'maplibre-gl/dist/maplibre-gl.css'
/src/views
Home.vue
<template>
    <div class="home">
        <v-container>
            <v-row>
                <v-col>
                    <h1>Amazon Location Service</h1>
                </v-col>
            </v-row>
            <v-row>
                <v-col>
                    <MapPane></MapPane>
                </v-col>
            </v-row>
            <v-row>
                <v-col>
                    <!--ログアウトコンポーネント-->
                    <amplify-sign-out></amplify-sign-out>
                </v-col>
            </v-row>
        </v-container>
    </div>
</template>

<script>
    // マップコンポーネント読み込み
    import MapPane from '@/components/MapPane.vue'

    export default {
        name: 'home',
        components: {
            MapPane
        }
    }
</script>

<style>
    .home {
        padding-top: 100px;
    }
</style>
マップコンポーネントを設定します。
<v-row>
    <v-col>
        <MapPane></MapPane>
    </v-col>
</v-row>
マップコンポーネントを読み込みます。
// マップコンポーネント読み込み
import MapPane from '@/components/MapPane.vue'

export default {
    name: 'home',
    components: {
        MapPane
    }
}
/src/components
MapPane.vue
<!--マップコンポーネント-->
<template>
    <div class='mapPane'>
        <!--マップ表示-->
        <div id='map'></div>
    </div>
</template>

<script>
    // MapLibre GL JSを読み込み
    import maplibregl from 'maplibre-gl'
    // Amplify読み込み
    import { Auth, Signer } from 'aws-amplify'
    import awsconfig from '../aws-exports'

    export default {
        name: 'MapPane',
        data() {
            return {
                credentials: null,
            }
        },
        mounted: async function () {
            // 認証情報取得
            this.credentials = await Auth.currentCredentials()
            // マップオブジェクト生成
            this.mapCreate();
        },
        methods: {
            // マップオブジェクト生成
            mapCreate: function() {
                // Amazon Location Maps読み込み
                const map = new maplibregl.Map({
                    container: 'map',
                    style: 'sample',
                    center: [139.7648, 35.6794],
                    zoom: 15,
                    bearing: 64.8,
                    pitch: 60,
                    hash: true,
                    transformRequest: this.transformRequest,
                });

                // コントロール関係表示
                map.addControl(new maplibregl.NavigationControl());
            },
            // Amazon Location Maps設定
            transformRequest: function (url, resourceType) {
                if (resourceType === 'Style' && !url.includes('://')) {
                    // スタイル設定
                    url = `https://maps.geo.${awsconfig.aws_project_region}.amazonaws.com/maps/v0/maps/${url}/style-descriptor`
                }
                if (url.includes('amazonaws.com')) {
                    return {
                        url: Signer.signUrl(url, {
                            access_key: this.credentials.accessKeyId,
                            secret_key: this.credentials.secretAccessKey,
                            session_token: this.credentials.sessionToken,
                        }),
                    }
                }
                return { url }
            },
        }
    }
</script>

<style scoped>
    #map {
        z-index: 0;
        height: 800px;
    }
</style>
MapLibre GL JSとAmplifyを読み込みます。
// MapLibre GL JSを読み込み
import maplibregl from 'maplibre-gl'
// Amplify読み込み
import { Auth, Signer } from 'aws-amplify'
import awsconfig from '../aws-exports'
認証情報を取得します。
// 認証情報取得
this.credentials = await Auth.currentCredentials()
styleに作成したマップの「Name」を指定します。
// Amazon Location Maps読み込み
const map = new maplibregl.Map({
    container: 'map',
    style: 'sample',
    center: [139.7648, 35.6794],
    zoom: 15,
    bearing: 64.8,
    pitch: 60,
    hash: true,
    transformRequest: this.transformRequest,
});
Amazon Location Mapsを読み込む設定をします。
// Amazon Location Maps設定
transformRequest: function (url, resourceType) {
    if (resourceType === 'Style' && !url.includes('://')) {
        // スタイル設定
        url = `https://maps.geo.${awsconfig.aws_project_region}.amazonaws.com/maps/v0/maps/${url}/style-descriptor`
    }
    if (url.includes('amazonaws.com')) {
        return {
            url: Signer.signUrl(url, {
                access_key: this.credentials.accessKeyId,
                secret_key: this.credentials.secretAccessKey,
                session_token: this.credentials.sessionToken,
            }),
        }
    }
    return { url }
},
Amplifyのロール設定
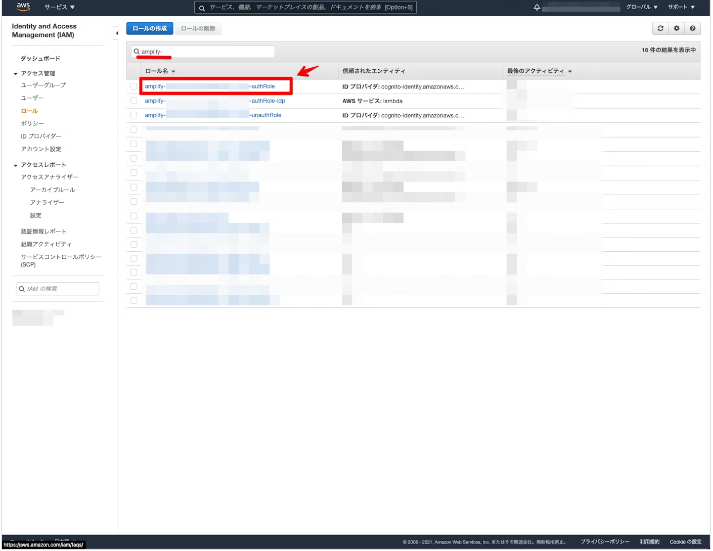
最後にAmplifyのロールにAmazon Location Mapsのポリシーを追加します。
ログイン機能で利用しているロールを検索します。「amplify-xxxxx-authRole」を選択します。
「インラインポリシーの追加」をクリックします。
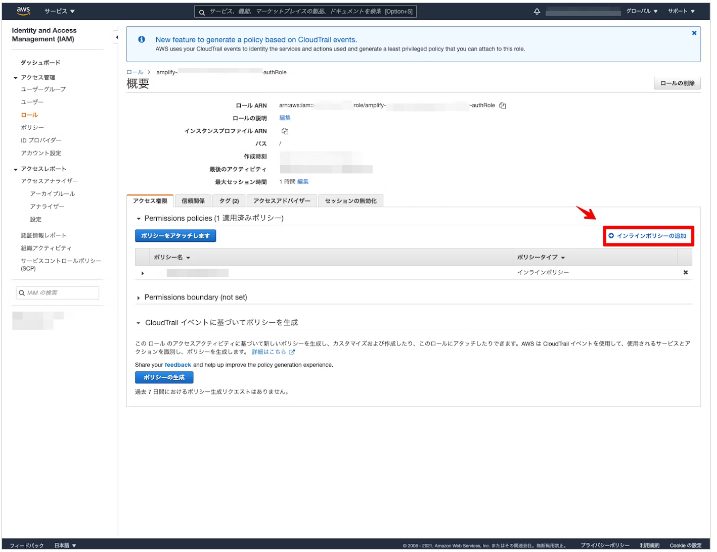
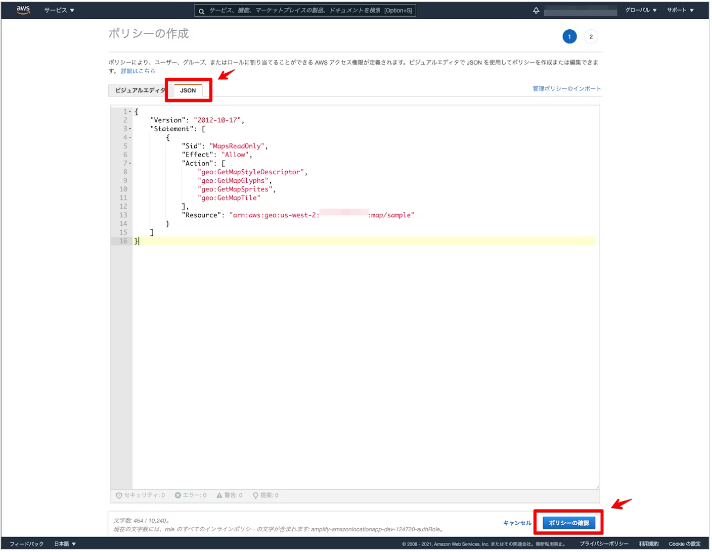
「JSON」を選択しポリシーを設定します。Resourceは作成したマップの「ARN」を設定します。
{
    "Version": "2012-10-17",
    "Statement": [
        {
            "Sid": "MapsReadOnly",
            "Effect": "Allow",
            "Action": [
                "geo:GetMapStyleDescriptor",
                "geo:GetMapGlyphs",
                "geo:GetMapSprites",
                "geo:GetMapTile"
            ],
            "Resource": "arn:aws:geo:us-west-2:xxxxx:map/sample"
        }
    ]
}
名前を任意で設定します。ここでは「amazon-location-maps」とします。
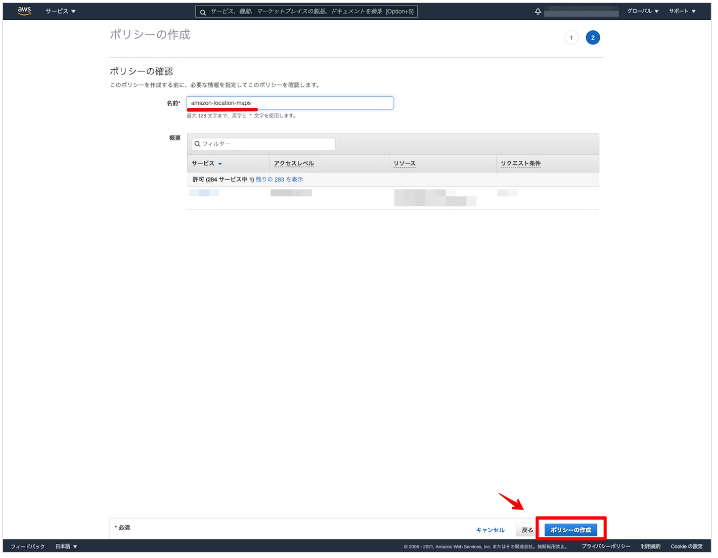
ポリシーが作成されているのを確認します。
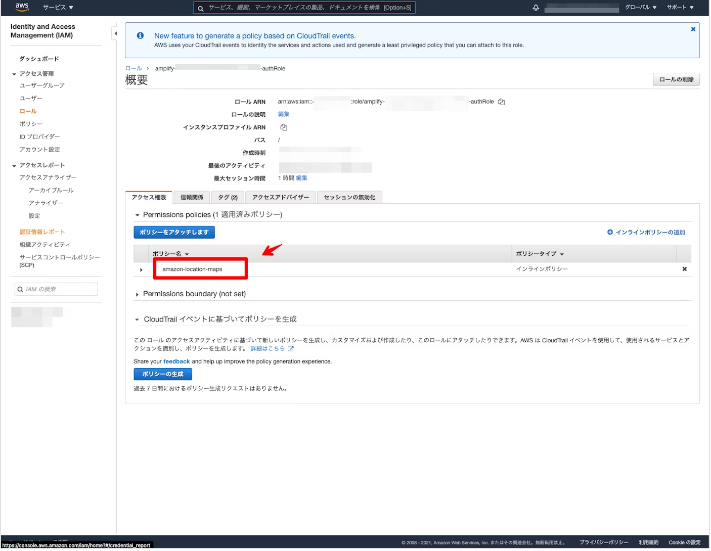
これでAmplifyのロール設定は完了になります ![]()
ローカルサーバーで確認してみます。
npm run serveローカルサーバーを立ち上げて、ログインしてみます。Amazon Location Mapsの表示を確認できます。
さいごに
事前にAmplifyを導入すると、Amazon Location Serviceを手軽に構築することができました。
参考記事
- Amazon Location ServiceとMapLibre GL JSとAWS AmplifyとVue.jsを組み合わせてマップアプリケーションを構築してみた
- Amplify Geoで住所検索機能を構築してみた
- Amplify GeoとVue.jsを組み合わせてマップアプリケーションを構築してみた
- AWS AmplifyとAmplify UI VueとVue.jsでログイン機能を構築してみた
- その他: Tag: vue-js
参考記事2
Amazon Location Service を使ってみよう!
※: Amazon Location Service で作成したマップをブラウザ上で表示
- マップの作成
- AWS Cognito の設定
- マップの表示
AWS新サービスAmazon Location Serviceとは?
1)Amplify GeoとAmazon Location Serviceの構築方法をまとめてみた
4)Amplify GeoとVue.jsを組み合わせてマップアプリケーションを構築してみた
5)Amazon Location Serviceで住所検索機能を構築してみた
6)Amazon Location Serviceでルート検索機能を構築してみた
7)Amplify + Vue.js で認証機能付きの Web サイトを公開する
JavaScript
1)Amazon Location SDKとAPIキーでルート検索機能を構築 109 2024/02/26に公開 新機能
GitHub: MapLibre User Group Japan
① maplibregljs-amazon-location-service-route-calculators-starter
② maplibregljs-amazon-location-service-starter
Amazon Location SDK and libraries
1.Amazon Location Service #001 – 環境構築
2.Amazon Location Service #002 – マーカー表示
3.Amazon Location Service #003 – マーカー複数表示
4.Amazon Location Service #004 – APIキー作成(マップ)
5.Amazon Location Service #005 – APIキー作成(ジオコーディング)
6.Amazon Location Service #006 – APIキー作成(ルーティング)
2)Amazon Location Serviceで作成したMapをWebアプリに埋め込む
3)amazon-location-utilities-auth-helper-js
4)Amazon Location SDKとAPIキーで住所検索機能を構築してみた
5)MapLibre GL JSとAmazon Location ServiceのAPIキー機能で開発環境を構築してみた 103
6)MapLibre GL JSとSvelteを組み合わせた開発環境を構築してみた
7)MapLibre GL JSとVue.js(script setup)を組み合わせた開発環境を構築してみた
GitHub: maplibregljs-vue-starter
8)Vue.js #006 – create-vueで環境構築
React
1)Amplify Geo で React アプリに地図を表示してみよう – AWS
2)Amplify GeoとAmazon Location Serviceの構築方法をまとめ
関連記事:
 Amazon Location Serviceとは?(1)
  Amazon Location Serviceとは?(2)
  Amazon Location Serviceとは?(3)+Cognito
  AWS Cognitoとは?
  AWS Lambda DynamoDB でCRUD
  Amazon Location Serviceとは?(4)位置認識とトラッカー
  Amazon Location Serviceとは?(5)SDKとAPIキー関連
  Serverlesss(AWS Lambda)
  AWSとは?
  AWS S3入門!
  AWS EC2入門!
  AWS RDS入門!
  AWS RDS入門(RDSでデータベースを構築する)
  AWS LambdaでPythonを使う
  AWS EC2の作成〜Apacheの起動
  WinSCPでAmazon S3に接続
  AWSアカウント作成の概要
  AWS Cognitoを使うべき3つの理由
  簡単な例で始めるVue3でTypeScript入門
  Vue.jsによるChat・サンプル
  ダッシュボード
  WordPress製 売上管理システム (専用テーマ販売)の事例 AWS EC2入門(Apache)
  AWS EC2入門(EC2を立ててログイン)
  AWS のアーキテクチャ図を描く
  AWSでWeb(4)独自ドメイン名でサーバーを公開する
  AWSでWeb(3)EC2とRDSでWordPress
  AWSでWeb(2)EC2にApache構築
  AWS Cognitoを使用してログイン機能を実装
  Amplify (2)Amplify利用準備・初期設定編